Setup NGINX Web Server with SSL Certificate on AWS EC2
NGINX is an open source software used to setup web server. It can either directly serve content or act as a proxy server. It supports protocols of modern web such as WebSocket, HTTP/2, gRPC, and streaming of multiple video formats (HDS, HLS, RTMP, and others)
In this tutorial, we will use NGINX to setup a simple web server that serves HTML documents. We will use AWS EC2 instance to host our simple web server. This tutorial shows how to spin-up an instance in AWS free tier. It also demonstrates how to generate a certificate using Let's Encrypt and associate it with your domain name. This optional part of the tutorial will secure our server with HTTPS.
Pre-requisites:
- AWS account - Create AWS account that we will use to spin-up EC2 instance
- [Optional] Domain name to be used to access our web server
Let's Begin!
Spin up an EC2 instance
-
Choose an Amazon Machine Image (AMI) - Select Ubuntu Server 20.04 LTS (HVM), SSD Volume Type as AMI type 64-bit (x86) variant. I selected this instance type since it is free tier eligible.
-
Choose an Instance Type - For the purpose of this tutorial, it suffices to use
t2.microinstance. You can use instance from other family as well depending on your requirement. -
Configure Instance Details - Keep default settings for this step
-
Add Storage - Keep default settings for this step
-
Add tags - Keep default settings for this step
-
Configure security groups Configure security groups as shown in the image below

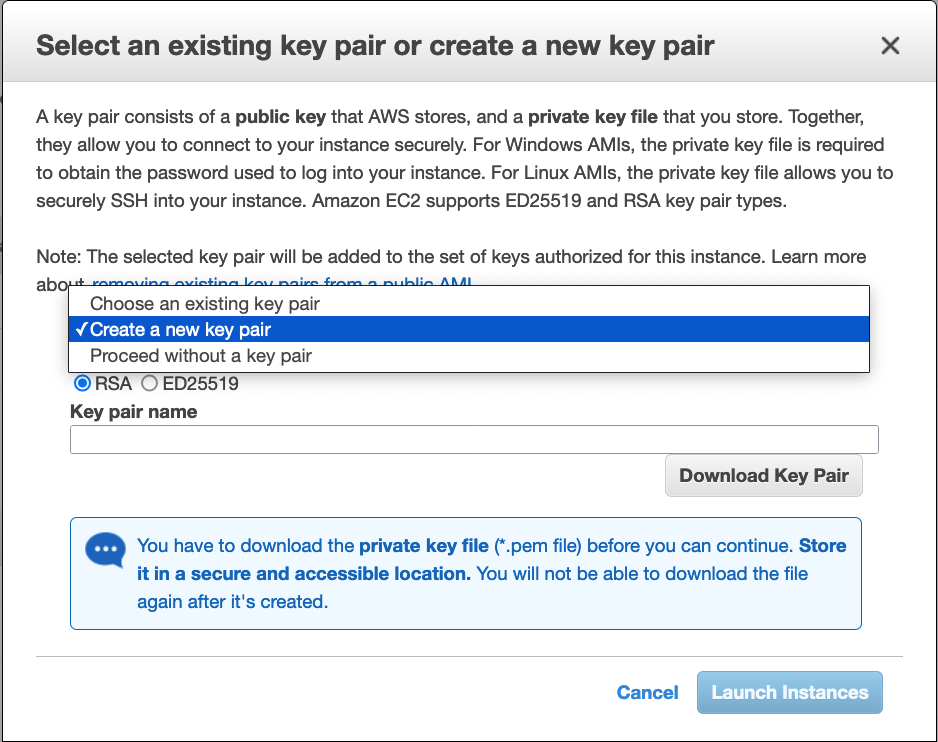
Before you launch the instance, it will ask whether you want to create new key pair or import an existing one. This key pair will be used to login to the instance. Select Create a new key pair, set Key pair type to be RSA, enter Key pair name e.g. hello_web. Download the hello_web.pem private key file.
Once the instance is in running state, grab its Public IPv4 address from Public IPv4 address field from Details section of the selected instance.
Optional: Add DNS records that point to the newly launched instance
If you have domain name that you want to use to access our web server, you need to create DNS record that resolves to IP address of the EC2 instance we previously created. You can use route53 to create such records.
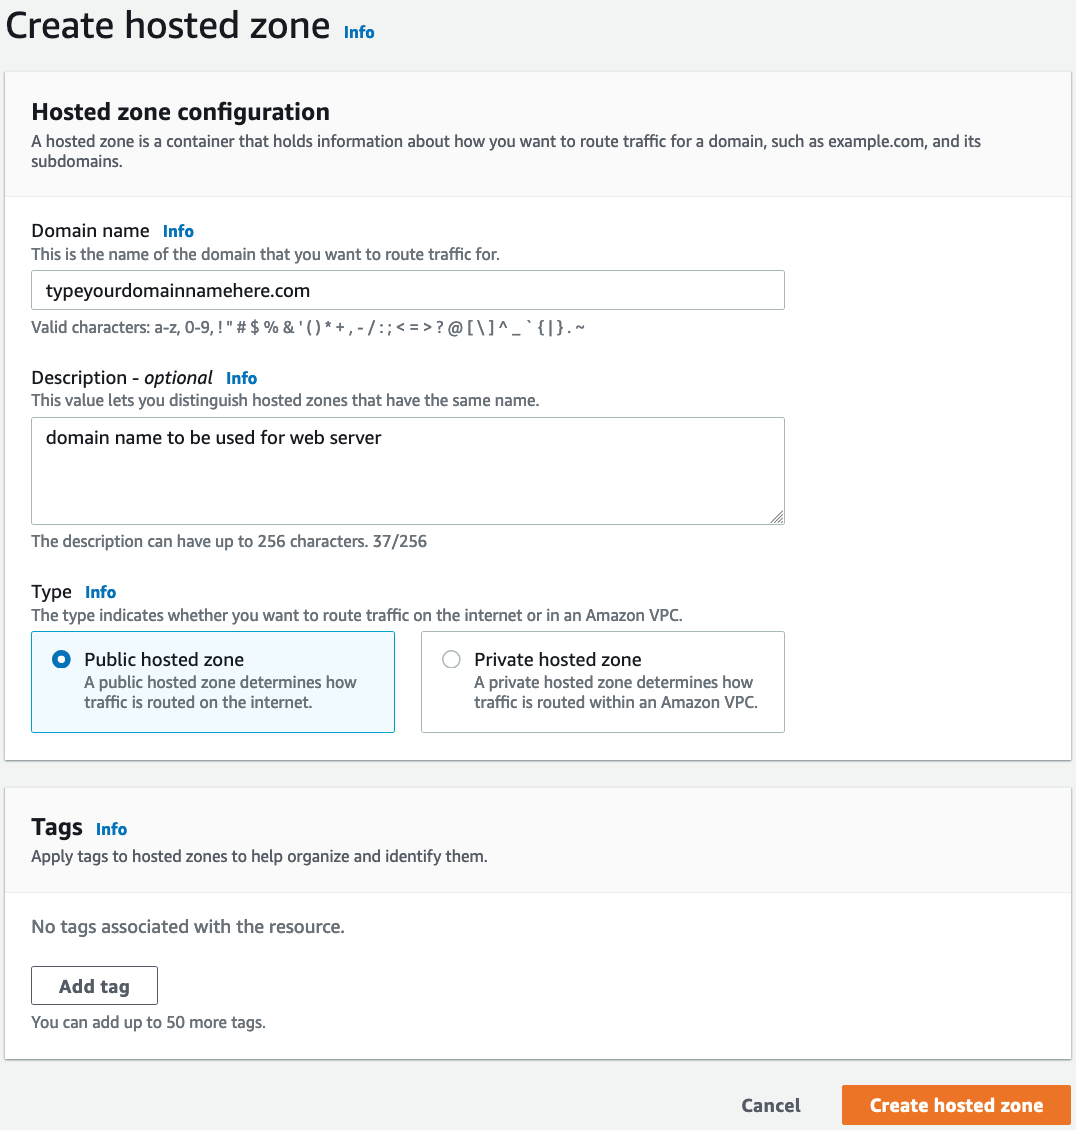
- Create Hosted Zone - Go to route53 dashboard in your AWS account. Click "Create hosted zone":
- Add type
Arecord for your hosted zone - Click "Create record". Select appropriate record name e.g.www.<your domain>.com. Select Record type as shown in the image below, put public IP address of your EC2 instance in value field. Click "Create Records" to create the record.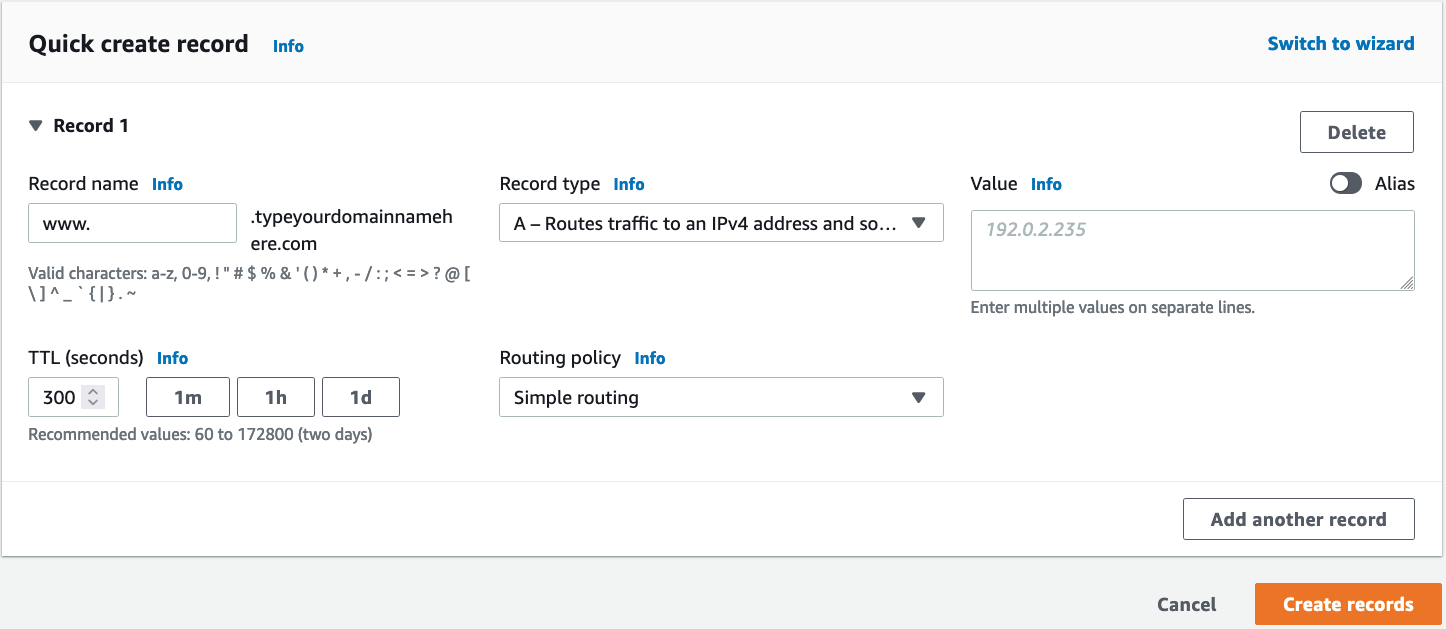
Install NGINX on EC2 instance
Login to EC2 instance using ssh. We need to specify .pem file via -i command line option as follows:
ssh -i ~/.ssh/hello_web.pem ubuntu@<your domain name>
Install NGINX on our ubuntu EC2 instance as follows
sudo apt-get update
sudo apt-get install nginx-full
Optional: Install Certbot and its NGINX plugin
Install certbot if you want to create certificate associated with your domain name. Creating this certificate will allow our web server to use HTTPS protocol using the certificate.
sudo apt-get install certbot python3-certbot-nginx
Configure NGINX for our web server
Create NGINX configuration for our web server as follows. It configures NGINX to listen on port 80, specifies location block that tells NGINX how to serve requests that have prefix /hello-web.
$ sudo cat /etc/nginx/conf.d/hello_web.conf

server {
        listen 80;
        # server_name www.pulleycloud.com;
        server_tokens off;

        client_max_body_size 20M;

        location /hello_web {
                root /usr/local/share/nginx/html;
                index index.html index.htm;
                try_files $uri $uri/ /index.html;
        }
}
Ensure that index.html exists in following directory:
$ cat /usr/local/share/nginx/html/hello_web/index.html
Hello web!
If you have a domain name that you want to use, update server_name option to use your domain:
server_name www.typeyourdomainnamehere.com; #use your domain here
Start/Restart NGINX
Command to start NGINX:
$ sudo nginx -t && sudo nginx
If NGINX is already running, use following command to reload new configs:
sudo nginx -t && sudo nginx -s reload
Generate Certificate using Certbot
Use certbot command with NGINX plugin to generate certificate associated with your domain:
$ sudo certbot --nginx -d www.typeyourdomainnamehere.com # use your domain here
Specify your email address if you want to receive notifications about certificate renewal and security notices:
Enter email address (used for urgent renewal and security notices) (Enter 'c' to
cancel):
Agree to the terms:
- - - - - - - - - - - - - - - - - - - - - - - - - - - - - - - - - - - - - - - -
Please read the Terms of Service at
https://letsencrypt.org/documents/LE-SA-v1.2-November-15-2017.pdf. You must
agree in order to register with the ACME server at
https://acme-v02.api.letsencrypt.org/directory
- - - - - - - - - - - - - - - - - - - - - - - - - - - - - - - - - - - - - - - -
(A)gree/(C)ancel: A
Choose whether or not to redirect HTTP traffic to HTTPS:
Please choose whether or not to redirect HTTP traffic to HTTPS, removing HTTP access.
- - - - - - - - - - - - - - - - - - - - - - - - - - - - - - - - - - - - - - - -
1: No redirect - Make no further changes to the webserver configuration.
2: Redirect - Make all requests redirect to secure HTTPS access. Choose this for
new sites, or if you're confident your site works on HTTPS. You can undo this
change by editing your web server's configuration.
- - - - - - - - - - - - - - - - - - - - - - - - - - - - - - - - - - - - - - - -
Select the appropriate number [1-2] then [enter] (press 'c' to cancel): 2
This command also updates our NGINX configuration to use the certificate it generated.
Now we have successfully configured our NGINX. Open your browser and query our web server by visiting http://www.typeyourdomainnamehere.com/hello_web/
Have any feedback?
If you have any feedback regarding this article or need tutorial on any specific topic, please submit this feedback form.